
Build your own egg incubator with a custom 3d printed egg turner!
Back in the early part of 2020, we decided that we would try our hand at hatching our own chickens in an egg incubator. We had always looked forward to our chickens going broody and having our very own farm hatched chickens but in 5 years, not one hen had ever gone broody consistently enough to hatch a single chic. Now if you just want to hatch your own chickens, all you really need to make an egg incubator is an old cooler a bowl of water with a sponge sticking out of it (keep it wet so the humidity stays up), a heat lamp, and a thermometer. Keep the eggs at 99.5 and turn them over 2-3 times a day. However, I have a tendency to make things complicated.
After doing some research on what egg incubators would cost, and what it would take to hatch chickens, our old auto defrost refrigerator looked like a prime candidate, but first I needed some way to auto-magically turn those eggs, so we weren’t turning them by hand every few hours. I had recently started binge-watching Angus over on Makers Muse. I started watching Angus partly because he’s so dammed positive and this whole covid thing was starting to affect my mood, but mostly because a friend of ours gave my eldest son a Monoprice Mini V2 3d printer and I’d wanted to play with my son’s new toy.
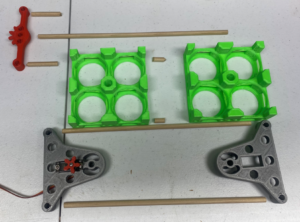
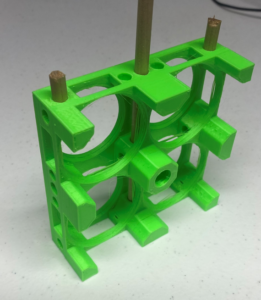
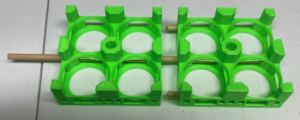
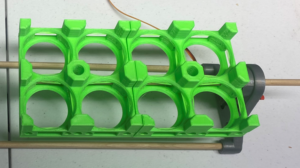
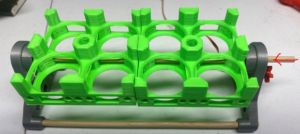
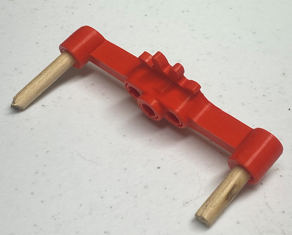
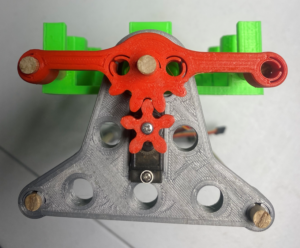
With the knowledge Angus has so graciously imparted to me I set to work designing, then redesigning, my egg turner until I got a prototype I was happy with. Looking back on this design, it seems so straightforward and simple. Just four parts needed to be designed; two gears, one leg (printed twice), and as many egg cradles as you want to stick together in a row. The parts are held together with wooden dowels and the whole assembly requires only three screws that come with the servo. At the time, learning to design those parts and figuring out how to get what I wanted out of the printer’s rather limited 120x120mm build plate (realistically limiting my print size to about 100x100mm) seemed anything but simple.
Now that I feel I’ve gotten enough storytelling out of the way here is what you need if you want to make one of your own.
A video of this guide is also available on YouTube
Make:
- Download the 4 STL files at the end of this post. (We retain all rights to this design. Free for personal use, commercial users please contact us)
- for each egg turner you want to make, print:
- 1 x”3d egg bar spur gear (10 teeth)”
- 1 x”3d egg spur gear (5 teeth)”
- 2 x “3d egg legs”
- 1 x (or more) “3d egg carrier”
Purchase:
- 1x MG90S Servo
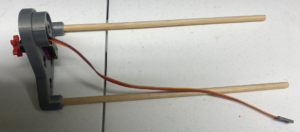
- 2 x “1/4” inch wooden dowels to connect the legs of sufficient length (approximately 100mm per cradle + 20cm per leg + 4 mm or so for clearance)
- 1x “1/4” galvanized steel rod of sufficient length (approximately 20mm longer than the wooden dowels) (if you use 3 or fewer egg cradles you may substitute a wooden dowl)
- 2x 15mm “1/4” inch dowels to connect each egg cradle to the next. (You will probably have enough leftover from the other dowels to make these)
- 2x 40mm “1/4” inch dowels to connect the “3d egg bar spur gear (10 teeth)” to the “3d egg carrier)
- Hot glue or super glue if you want to permanently secure any of the dowels in place.
Assemble:
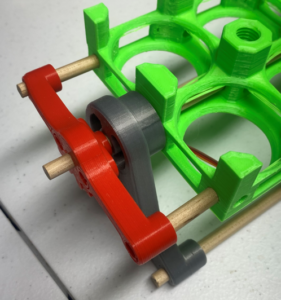
- Install the servo into one of the “3d egg legs”
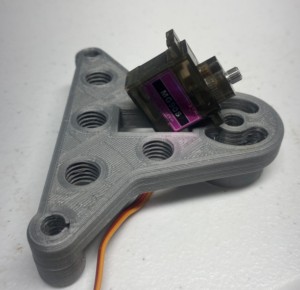
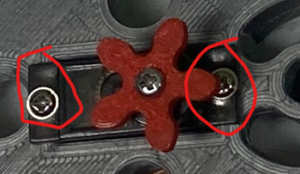
Use the two wood screws supplied with the MG90S micro servo to secure the servo to the “3d egg leg” ( Note: you may want to install the “3d egg spur gear (5 teeth)” It may be easier to install the gear for the first time before the leg is attached)
Install the dowels into one of the legs.
Install two 15mm dowels into each “3d egg cradle”.
Slide the “3d egg cradles” onto the central rod or dowel and push them together so that the 15mm dowels are securing the cradles together. Leave all of the extra central rod or dowel extended out of one end of the assembly.
Slide the central rod or dowel extending out of the egg cradle assembly onto the “3d egg leg” that already has the dowels installed.
Slide the remaining “3d egg leg” onto the dowels installed in the first “3d egg leg”
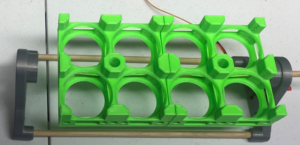
With the Legs installed push the central rod or dowel into the newly attached leg. leave 1-2mm of clearance between each end of the egg cradle and the legs so that the cradle does not bind when being turned.
Install the 40mm dowels into the “3d egg spur gear (10 teeth)”
Install the “3d egg spur gear (10 teeth)” onto the egg turner. (if you previously installed the “3d egg spur gear (5 teeth)” on the servo remove it first.)
Center the servo. Use the spur gear or the servo arms that came with the MG90S to center the servo so that it has an equal amount of motion in each direction.
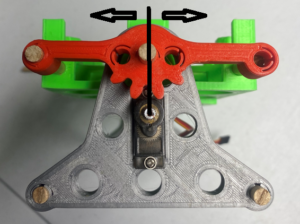
Level the egg cradle assembly and Install the “3d egg spur gear (5 teeth) onto the servo.

Install the set screw into the servo to hold the gear in place.
If you want to make your very own auto-magic pi (or Arduino, esp32, OTC timers etc.) controlled Egg turner, or you just want to hand turn them, but would rather they be in a convenient cradle holding the whole lot rather than turning them one at a time please you can download the files below.
These works are licensed under a Creative Commons Attribution-NonCommercial 4.0 International License. We consider “commercial” use as selling the files or prints made from the files. We ask that you do not sell the files, nor sell prints based on our STL files. You may use the files and prints for your own use. For instance if you are a farm and use objects based on these prints to hatch birds that you then sell, or sell eggs from that is fine with us.